How to update your BIOS on the MSI FM2-A85XMA-E35
Did you get the MSI FM2-A85XMA-E35 and like me without thinking, updated using the MSI Live updater? Well, you’ve probably found yourself with a screen that says something like “BIOS not valid, please update to A Richland supported BIOS, press F1 for setup.” I’m here to tell you not to panic. I know the thought of not booting into Windows can be rather frightening, but I’m here to help you. Why help me you ask? Well because MSI’s site just isn’t that helpful, and I had to figure it out by myself. Hopefully you won’t have to experience the panic I did! (Okay, not really I was playing league of legends and browsing solutions at the same time)
Enough of my useless rambling, here’s how to update your bios on the MSI-FM2-A85XMA-E35 motherboard.
Updating the BIOS on the MSI FM2-A85XMA-E35 Motherboard
Assuming you’ve gone to the MSI webpage and checked the drivers page already, you’re probably left sort of confused if you’re updating to the Richland supported BIOS. If you haven’t I’ve got two different routes for you. Depending on what you’ve done so far, you’ll need to follow the steps below. We’ll start with those who updated using the MSI live updater, and then continue with those who can still get into Windows.
I installed the BIOS Via live updated and I can’t boot to windows.
Alright, you can’t boot to Windows. Don’t worry, I got you covered. Just follow these steps and you’ll be good to go in about 5 minutes.
Items required:
- USB Flash Drive
- Computer
- Monitor
- Keyboard
- Mouse
- Another Computer capable of downloading and transferring files to the USB Flash Drive
1. Go to the MSI FM2-A85XMA-E35 BIOS download page and download BIOS 1.5. Why 1.5? Unlike the more current versions, this version allows you to install the BIOS directly from the UEFI interface. The others require you to boot into Windows, which you obviously can’t do right now.
2. Extract the .zip file containing BIOS version 1.5 and put the files onto the USB flash drive. (You don’t have to format or erase the data on the USB flash drive before this step)
3. Boot the computer with the MSI FM2-A85XMA-E35 motherboard and press the “delete” key until you’re into the UEFI interface.
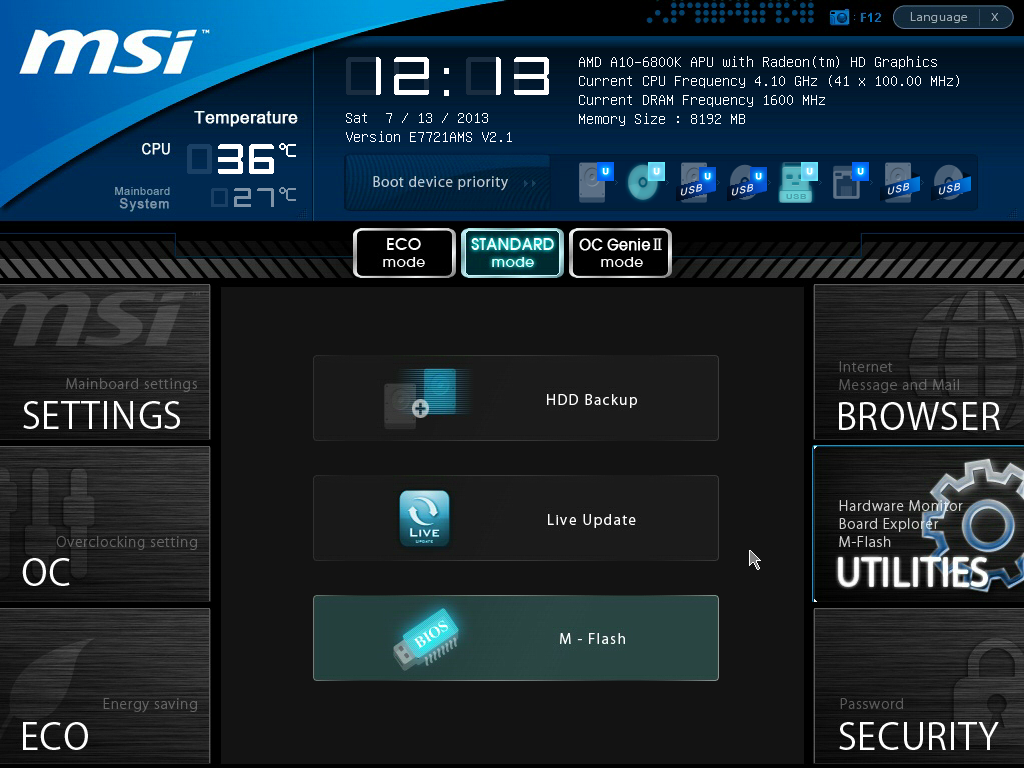
4. Click on “Utilities” on the right hand side.
5. Click on “M Flash”.
6. Click on “Update BIOS”.
7. Click on “Select one file to update BIOS” and select your USB flash drive. (If you only have one USB flash drive plugged in, it will be the only drive listed)
8. You should have one option come up, click on “E7721AMS.210” to start the BIOS downgrade process.
9. Give it a minute to start the flashing process. Once completed, your computer should automatically restart and boot into Windows.
10. Now that you’re back into windows, go to the MSI webpage and download the MSI AM2-A85XMA-E35 BIOS version 2.1.
11. BIOS Version 2.1 is a .exe file. Simply open the .zip file and run the .exe. After it finishes flashing, you should be able to boot right back into windows have the most updated BIOS.
12. Enjoy, and pat yourself on the back for a job well done.
I haven’t updated by BIOS and I want to know how to update my MSI FM2-A85XMA-E35 to the Richland supported Bios.
- Go to the MSI webpage and download the MSI AM2-A85XMA-E35 BIOS version 2.1.
-
Extract the .exe file from the .zip.
-
Run the .exe file.
-
Enjoy.
The MSI FM2-A85XMA-E35 board used for this guide was provided via the by AMD via the AMD Test Drive Program.
Join the Forum discussion on this post


Merci Monsieur,
Vos explications sont claires, précises et efficaces.
J’avais les mêmes problèmes.
Je peux ajouter qu’il faut télécharger et installer le driver 13-4_win7_win8_64_dd_ccc_wql alors la puce radeon 8470 est reconnue par windows
Thanks for your help, although I think step 8 should read “E7721AMS.150” instead of “E7721AMS.210″. However, it does not work. I am in the situation that I upgraded the BIOS via Live Update and now Windows will not boot anymore. I cannot flash the old 1.5 BIOS (or any other BIOS for that matter) because the system refuses to find the BIOS on the USB stick.